Feeling Crafty - Wrapped in Thread
This summer I taught a jewelry making course to kids, and one of my favorite projects was embroidery thread wrapping. It's pretty, simple, and fun. Seven year olds were making headbands for themselves that looked just like the ones J.Crew was selling! Here's how you do it for yourself...
You'll need: an unwanted bracelet, embroidery thread, and tape, (scissors, too!) Clear drying glue, modpodge or nail polish is optional.
Step one: Agonize over your color choices. (Maybe that's just me...)
Step two: Cut a strand of your first color. The thicker the stripe of color you want, the longer your strand of thread should be. For my bracelets, I cut pieces between 8 inches and one foot long.
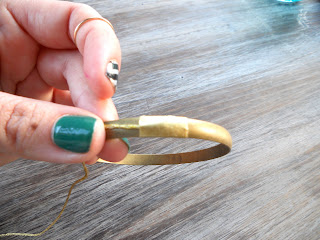
Step three: Tape one end of your thread to your bracelet. Leave the other end loose, like a "tail'.
Step four: Wrap the tape tightly around your bracelet.
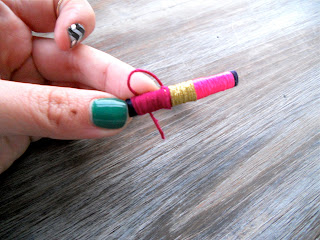
Step five: Begin wrapping the thread around the bracelet, covering up the tape. Make sure to keep the thread tight as you work, or else it'll come unraveled. (This is much easier than it looks in the pictures. I had to do all the work with one hand, so I could photograph with the other! With two hands, it's easy-peasy.)
Step six: When you're ready to change colors, cut a new piece of thread and a small strip of tape. Use the tape to cover the end of your old thread and stick down your new thread, with the end hanging out the top, so you can cover the tape later.
Optional step eight: You can also coat the end (or even the whole thing!) with clear drying glue, modpodge, or nail polish to seal it in place, if you want, but it's not necessary.
Ta da! You're done!
Here's everything I've made so far. I even got fancy on my sunglasses! It's removable, should I ever change my mind.
Look at the way my new wrapped bracelet mixes with the others! ♥
And just for fun, here's a few other wrapped items that I've seen out there:
Here's the J.Crew headbands (no longer available, originally $19.50)
J.Crew also did shoes! (no longer available, originally $228)
This belt is $70 at Cold Water Creek, but you could make one for a lot less!
Rachel of Always a Project made this necklace by wrapping washers! She has a tutorial here.
Off the top of my head, this project could also work with:
pens
frames
bobby pins
shoelaces
buttons
silverware
bicycle handlebars
purse straps
basket handles
drawer pulls
...
What will you wrap?


I LOVE this bracelet...such a simple idea, but this post definitely inspired me to make one of my own. Thanks for sharing! xo
ReplyDeletewhat a fun and creative idea! i'm eager to try it out. i also love your nail polish in the how to steps ;)
ReplyDelete